Friday, 25 September 2009

Sorting Numeric Arrays with Actionscript

Just lately I have been having fun with arrays. Of course, I say "having fun", what I mean is having problems. Especially with sorting numerically.

Arrays are really useful, they allow you to store data, select data, order it, etc. You can create them from strings and other variables, and turn them into strings and other variables. All in all, they can be very handy.

I found them handy as part of a game I was writing a couple of days ago. As part of my code I needed to find the number with the highest value out of a choice of 3 numbers. The logical solution was to put all 3 numbers into an array, then sort them numerically, then retrieve the last item in the array (this should, after sorting, be the one with the highest value).

Numeric sorting is not numeric

Let's say we start with the following array:

var my_array:Array = [650,12,86];

Then we sort them numerically:

my_array.sort(Array.NUMERIC); //doesn't work correctly

After this command you might expect flash to order the array as:

12, 86, 650

But what you actually get is:

12, 650, 86

This is because, as the Flash documentation explains, 'Numeric fields are sorted as if they were strings, so 100 precedes 99, because “1” is a lower string value than “9”. '

In other words, the Numeric sort does not sort numerically at all. It sorts alphabetically. Odd sort of numeric, but it can't be helped, we have to find a solution.

Prepending 0s so all values have the same number of digits

Of course this only happens because not all the values had the same number of digits. If the lower values began with a 0 then a numeric (alphabetical) sort would work correctly. So my initial plan was to use an if statement in a for loop to check for 1 digit, 2 digit and 3 digit numbers and prepend (put in front) 0s to make them all the same number of digits as follows:


for (var i = 0; i<finalscores_array.length; i++) {

if (finalscores_array[i]<=9) {

finalscores_array[i] = "000"+finalscores_array[i];

} else if (finalscores_array[i]<=99) {

finalscores_array[i] = "00"+finalscores_array[i];

} else if (finalscores_array[i]<=999) {

finalscores_array[i] = "0"+finalscores_array[i];

} else {

finalscores_array[i] = finalscores_array[i];

}

}


With for loops we can repeat a peice of code until a condition is met. This loop repeats for the length of the array (that's the number of items in the array). It starts by checking how many digits the first array item has. Then depending on how many digits the code prepends 3, 2, 1 or no 0s. On the next repetition it checks the next array item, and so on until all array items have been checked and had the required number of 0s prepended so that they all have the same number of digits, and then the loop ends.

The result is that the original values:

650, 12, 86

become

0650, 0012, 0086.

Now when we sort them numerically, it does put them in the right order:

0012, 0086, 0650.

Leading 0s alter the value (it's a decimal v. octal thing)

Wouldn't it be great if that was the end of your troubles?

The problem is that if we then want to do anything with the values afterwards, like doing anything other than displaying them, we need to remove the 0s we just added. And it is not nearly as easy taking off, as putting on.

The reason we have to remove the leading 0s is because Flash, like lots of other programs, does not treat numbers beginning with 0 as decimal numbers. It treats them as octal. This means that 0650 does not have the same value as plain old 650 (without the leading 0).

0650, as octal, actually has the decimal value of 424.

0650 is in fact a totally different number to 650.

So while prepending leading 0s solves our array sorting problem, it actually changes our values. just because a leading 0 in Flash means it is an octal value, not a decimal value.

Leading 0.0 do not alter the value (it's a less than 1 thing)

But then I realised. Hang on a minute says I (yes, programming problems really can have you doing a good Ben Gunn impression). Hang on a minute says I, Flash handles numbers begining with a 0 all the time. What about 0.1, 0.2 etc. It has no problems with decimal values of less than 1.

And here is my solution. Instead of using my for loop to prepend just 0s, I will use it to prepend 0.0s, as follows:


for (var i = 0; i<finalscores_array.length; i++) {

if (finalscores_array[i]<=9) {

finalscores_array[i] = "0.000"+finalscores_array[i];

} else if (finalscores_array[i]<=99) {

finalscores_array[i] = "0.00"+finalscores_array[i];

} else if (finalscores_array[i]<=999) {

finalscores_array[i] = "0.0"+finalscores_array[i];

} else {

finalscores_array[i] = "0."+finalscores_array[i];

}

}


The result is that the original values:

650, 12, 86

become

0.0650, 0.0012, 0.0086.

Now when we sort them numerically:

my_array.sort(Array.NUMERIC);

It does put them in the right order:

0.0012, 0.0086, 0.0650.

OK, I know that doing this has changed the values too, but at least they are still decimals (not a totally different numbering base). Because they are still decimals it is easily rectified, it's just a case of shifting the decimal point a few places. And we can do this by very simple multiplication...

...just multiply them by 10,000.

0.0012 x 10000 = 12
0.0086 x 10000 = 86
0.0650 x 10000 = 650

So, to finish off, now we have prepended 0.0s to our original values, then sorted them, all I need to do to get the highest value is retrieve the last item from the array, and multiply it by 10000.

var highestscore:Number = (my_array[my_array.length-1])*10000;

The Faster Way

Having made this wonderful discovery, it is good to know that all the code required to debug and investigate the problem is not necessarily needed to apply the solution. Pre-pending using the IF and ELSE IF is only necessary if you want to pre-pend digits to a String (as in converting 650 to 0650). Now that we have discovered that only decimals (as in 0.650) will sort correctly there is a much simpler way to achieve this.

Simply - divide the original number by 10000 (after all, we convert them back by multiplying them by 10000).

for (var i = 0; i<finalscores_array.length; i++) {

finalscores_array[i] = finalscores_array[i] / 10000;
}

I count that as 7 lines fewer code, than the pre-pending method.

That's the difference between what we do to understand a problem and what we do to apply a solution.

And there we have it. Hopefully some of you will find this helpful. Frankly I don't know why numeric sorting doesn't just work. But since it doesn't, here is a cheap and cheerful workaround - in summary:

1. Divide them all by 10000 (so that every number begins "0.")
2. Sort them
3. Multiply them all by 10000 (so you get the original values back)

Happy sorting.

Wednesday, 16 September 2009

Design industry calls for "More Rounded" design graduates

This is always one issue that concerns me about my students. You get the creative ones who hate computers, then you get the computer geeks who think knowing the software will somehow make up for their lack of creativity.

They are both wrong. Where interactive media is concerned anyway.

Design Week reports that the D&AD Xchange conference for tutors once again highlighted the "mismatch between the kind of graduates design colleges are providing and what consultancy creative heads require".

And what do design consultancies require in new graduates? In their own words "More rounded" graduates. By this they mean more creatively rounded - more understanding of creativity, more understanding of design. Rather than a 2 or 3 year higher education in design some have even suggested a 3 year foundation course in design (allowing design students to experience a wide variety of creative disciplines while developing their creativity) followed by only one year of specialisation.

For some of my students that would mean not getting into the web design and interactive media technology for another 3 years - and meanwhile, they learn to be creative designers in many different media.

Oddly perhaps for art & design (though not so odd perhaps for a wanabee web designer) many of my students seem to resist the creative development required to be an effective designer. Many are focused so much on learning the technology, they are in danger of being technically good, but creatively stunted - able to use technology, but not to solve design problems.

As Neville Brody puts it: "We imagine to be able to do anything, and our software helps us believe we can... But we must move beyond the 'how' to reconsider the 'what' and the 'why'."

This is my greatest fear for some of my design students. They are most interested in learning how to do something, but ignore the important business of learning how to decide what they should produce and why.

Those who persist in making this mistake may well regret it. Leaders from the industry have spoken, they want creative people, not just technitians.

If they resist the creative development aspect of their education, they may get what they want in the short term, but in the process fail to become what their employer wants.

Saturday, 5 September 2009

FREE eBook - The Principles of Successful Freelancing


Whether you are a Freelance, Student or work within a studio, you will probably find Sitepoint's latest offer an interesting if not valuable read.

It's a 200 page eBook on The Principles of Successful Freelancing.

It normally costs about $30 but Sitepoint are giving it away FREE for the next 8 days.

To get the book you must either follow them on Twitter or submit your email address to their mailing list.

Sitepoint often give away selected chapters from their books as tasters, but this is the first time I have seen them give away an entire book. Clearly a good strategy for increasing their Twitter following (currently 49,662) and mailing list sign-up - we could all learn a trick there.


Monday, 31 August 2009

Help for BlueOnyx Server Maintenance

My last post looked at setting up a testing server for web designers. One of the options included building your own server running BlueOnyx for easy set-up and easy server management.

The thing that makes server management so easy is the web based interface. Originally the interface was only available for Sun Cobalt hardware, but once Cobalt was discontinued Sun Microsystems released the source code as open source. Since then others have developed it to work with any hardware (great news for us) and is most currently available as BlueOnyx.

PDF Manual

Because the BlueOnyx server management interface is based heavily on the sourceode for the Cobalt RaQ 550 the old RaQ 550 manual still contains some useful instruction on managing the system, and you can download it in PDF format here:


Comparisons

The great thing about the BlueOnyx (and Cobalt RaQ) is how easy the server management interface made server management for non-techies.

Server managment after all was traditionally done through a shell interface (not unlike the windows command prompt). Setting up a web site involved manually creating users and folders, manually setting permissions and quotas, and manually editing several config files without making mistakes.

What the BlueOnyx interface does (and what the Cobalt RaQ interface did) is turn this process into an interface. You simply fill in the blanks and press "go" and scripts automatically create the folders and permissions and update the config files. Happiness.

There are other web based server management systems such as Plesk or Webmin.

Plesk is perhaps the easiest (it really is aimed at hosting companies, providing an interface for customers), but it costs money.

Webmin, is secure and powerful and popular with techies, but IMHO much more difficult to use than BlueOnyx because you still have to do many things manually. You still need to create the folders, set the permissions etc... albeit through a browser rather than a command prompt. And that requires a fair amount of technical knowledge.

BlueOnyx arranges things differently. It assumes you have limited technical know-how, but that you do know what you want at the end, and arranges the interface into tasks rather than tools. So much easier.

Setting Up Your Own Testing Server

Call it what you like, a "testbed", a "testing server", a "sandbox server", it all amounts to the same thing - a server for testing your sites, scripts, databases before you "go live".

When it comes to web design I prefer to use Dreamweaver (in conjunction with Flash, Fireworks and occasionally Photoshop). And when it comes to static websites that's all fine, you can test them in Dreamweaver by hitting F12 and getting a preview in your browser. But for more advanced sites this will not do...

3 good reasons why you need a testing server

Going beyond static sites, to sites that include server-side scripts (such as PHP or Perl (CGI)) or database connections such as discussion forums, content management systems or shopping carts, it is really useful having a place to test before you "go live". Having your own server allows you to regularly test as you develop without long upload times, and without your client getting glimpses of half finished work.

It's also great for designers wanting to learn or improve their dynamic web skills. So you want to learn some PHP? So you want to learn how to get Flash to talk to a database? So you want to practice setting up and customising a content management system or shopping cart? You're going to need a server - it's a handy place to practice without needing to buy webspace.

Finally, if you want to use Dreamweaver's testing server facility when you set up your site in the "manage sites" window... you need a testing server.

Admittedly, if you have a website of your own you could use your own website host for testing and practice by shoving it in a folder separate from the rest of your site. But this is far from ideal, since your testing site will be running from a folder below the web root, when you intend to run it from the web root when you "go live". Much better is to test it as it will run when live.

Relax

I confess that if I had not learned what I now know, the whole idea of setting up a server would be enough to send me back to bed for another couple of hours. It sounds complex, but some very clever and generous people have made it much easier than it used to be - read on.

Before we go any further - LAMP or WAMP?

Before we go further let me introduce the server platforms I will be discussing today - LAMP and WAMP.

L - Linux
A - Apache
M - MySQL
P - PHP

or

W - Windows
A - Apache
M - MySQL
P - PHP

You will already be aware that Linux and Windows are operating systems, and really that is the only major distinction between the platforms above.

Apache is FREE open source web server software.

MySQL is FREE open source database server software.

PHP is a FREE open source server-side scripting language/engine.

Loads of websites run on LAMP or WAMP. Loads of web hosting companies use LAMP or WAMP to host websites commercially. In fact, last time I checked, Apache was the most installed web server in the world.

Loads of free web software runs on LAMP or WAMP too:

PhpBB
Zen Cart
Joomla
Drupal
Moodle
To name but a few...

All free and all running on free server software. At some point I guarantee you will want to install at least one of these for a client or for your own use, you need some practice, you will need to test it as you "skin" or "theme" it, you need a testing server running Apache, MySQL and PHP.

(Although I am not going to explain commercial alternatives in this post, you should be aware that you don't have to use FREE open source server software, a popular proprietary alternative would be Microsoft's Internet Information Server (IIS), MSSQL a database server and ASP or ASP.NET for server-side scripting. The drawback is that this all requires a commercial license. the other drawback it that I won't be explaining these today.)

A couple of approaches

There are probably many approaches you can take, but I am going to discuss what are to me 2 of the easiest options:

1. Install a server on your development computer
2. Set-up a server using an old computer

Let's start with the first...

Install a server on your development computer - WAMP

This is my least favourite of the two options, but if you want something quick, and you don't have an old computer kicking around it's a good alternative. I use a Windows XP machine for web design and development, so this solution is effectively a WAMP solution.

The easiest way is to get a pre-configured bundle of Apache, MySQL and PHP and install it as an application onto your Windows machine. There are several free options, but I recommend:


or


Setting-up

Download the installer, run it, and voila, you are done.

The installer sets up all the server software you need, and creates a web root folder. To test your site all you need to do is copy the files into the web root folder and start browsing. Your new installation of Apache, MySQL and PHP will process files in or below the web root folder as though they were on a web server (in fact they are on a web server at this point).

Couldn't be simpler.

Although I have used this type of approach many moons ago with Apache Triad, and while it is quick and easy, I recently built a server on a totally separate computer, rather than installing it on my development machine, and I prefer it - I guess I just don't like to clutter my graphics workstation up with too much other software (it's sucking my resources dry man, I can feel it) - just a little harmless paranoia. Which brings me to...

Set-up a server using an old computer - LAMP - the "real deal"

I did this just last week as the culmination of sporadic research over several months. You might think that setting up your own server hardware and software is the stuff of IT technitians and not the realm of designers, and depending on the type of designer you are, or your background you may still want to leave it to your techie friend. But I managed it so I urge you to read on.

And of course the great thing about this approach is that you are not making a simulation of a web server, you will end up with an actual web server in every sense. Stick it in a datacentre and you really could use it to host yours and your clients websites and email (if you wanted), this is the "real deal".

And being the "real deal" it has several advantages:

1. More than one person can use it as a testing server simultaneously - which makes it ideal for web design studios with several designers, and ideal for schools/colleges/universities/education allowing more than one student to upload and test their projects.

2. Each user can have their own login and testing server space. In fact each project can have it's own server space and login.

3. FTP, HTTP, HTTPS, PHP and MySQL all work the way they should.

As a testing server it is ideal because it is a real server.

There are loads of LAMP options out there, but being designers, not technitians we want one that is:

1. Easy to set-up
2. Easy to operate once set-up
3. Free - we're on a budget

Which, after my research and experience, leaves me with one option that ticks all boxes:


It is described as a turnkey solution (meaning it is as easy as turning a key to get up and running) and it really is straightforward.

Setting-up

1. Is your network suitable?

Before we go any further you need to check that you are the right kind of network to have a server. Answer the following questions with a "YES" and you can go ahead:

Do you have a network hub or router with a spare LAN socket?
Do your other computers connect to the hub or router using ethernet cable or wireless?
Does the router connect to your broadband connection?

If you answered "YES" to all 3 questions, then you can go ahead. Hoorah.

2. Get your machine

First you need an old computer that works, but which you no longer need. the computer should have at least the following:

Processor (CPU): Reasonable speed
RAM: At least 256Mb
HDD (at least 40Gb)
Graphics Card: (spec irrelevant)
Network Card: 10/100 Mbps
Other Drives: Floppy, CD ROM

The higher the spec the better, but don't worry too much, I am running a working testing server with BlueOnyx on the following very low spec machine:

Processor: PII 266MHz
RAM: 256Mb
HDD: 80Gb
Graphics: 8Mb
Network Card: 10/100 Mbps
Other Drives: Floppy, CD ROM
Sound: None

And it all works like a dream. The fact is that my testing server doesn't have to put up with much load. It won't be experiencing thousands of visitors, only me, and in most situations a testing server probably won't have more simulaneous users than the number of designers using it. Obviously, the more users the the better your computer needs to be but the main areas of concern are:

HDD - Improve this to hold more files

RAM and Processor - Improve these to handle more simultaneous visitors

Web servers DO NOT need a good graphics card, they spend most of their time without a monitor plugged in because they are managed over the web via a web browser or shell client. Nor do they need a sound card.

3. Check you don't need it

Make sure you really don't need the machine for anything else.

Make sure you don't need any of the information on the Hard Drive. What we do next will wipe it completely. You will lose all data, software, downloads, accounts information, everything.

If you are using an old windows machine with an OEM Windows XP sticker on it, you need to know that we will be wiping Windows off the machine, and you won't be able to transfer the Windows licence to another machine. OEM licenses stay with the machine.

Are you sure you can spare this machine?

OK, let's move on.

4. Set up the machine for install

For installation you need to temporarily hook up a monitor and keyboard to the computer you plan to use. Make sure it has power but don't turn it on yet. Make sure it is connected to your network hub via the ethernet port in the network card.

5. Download and burn the BlueOnyx server set-up disk

The BlueOnyx set-up disc needs downloading as an ISO file and then burning to a blank CD.

Download the ISO file here:


Once downloaded you need to burn the ISO to a blank CD.

If you don't have software to burn the ISO to a blank CD, I recommend:


Burn baby burn.

6. Install the server software

This is the really exciting bit. Your old computer becomes useful again as a testing server.

Open the CD ROM drawer and insert the set-up disc.

Reboot the machine.

Booting from CD :-)

In most cases your computer will check the CD drive first, to see if it can boot from CD. If this is the case follow the on-screen prompts until installation is complete.

MAKE SURE you write down or remember usernames, passwords and IP addresses you put in during installation. You will need them later.

Not booting from CD :-(

You will know if the computer does not boot from CD if you see Windows starting up, or nothing happens and it complains it cannot boot. If this is the case you need to make sure the computer boots from the CD ROM drive before it boots from HDD by changing the "boot order" or "boot priority" in the BIOS.

Do this by pressing reset or restarting the machine, then hitting the F8 or F10 keys as soon as it starts booting up (a note on the screen should tell you which key).

Then the BIOS menu will appear and you need to hunt around for the "boot order" or "boot priority" and set CD or Optical Drive to be FIRST.

I would show you in detail but all BIOS menus are different (get your techie friend to help if you are not sure).

7. After installation

Once the server has finished installing (you will know because it will reboot and tell you to remove the CD) it is ready to begin acting like a server.

At this point you can unhook the monitor and then find a place where it won't get in anybody's way and plug it into the network there and switch it back on.

After a few minutes it will have booted up and you will be able to access the server via the web browser of any computer on the network and finish the set-up.

To do this simply input the IP address you gave to the server into your web browser.

You will then get lovely web interface to the server and be able to finish setting up.

And that's a wrap

At this point you have a web server. Look out for a future post on how to set-up "sites" on the server so you can test your work.

If you want to have a go on your own. Check my next post.

Monday, 24 August 2009

Descartes Day


In these modern times with such a rapid pace of progress we often mistake old or antiquated as meaning irrelevant. But we couldn't be more wrong.

I learned yesterday, from a child's book, that major principles on which much of my Actionscript is based were invented (or discovered) 372 years ago in the year 1637. The man we have to thank for bothering to write his discovery (or invention) down is the mathematician and philosopher Rene Descartes (pronounced day-cart).

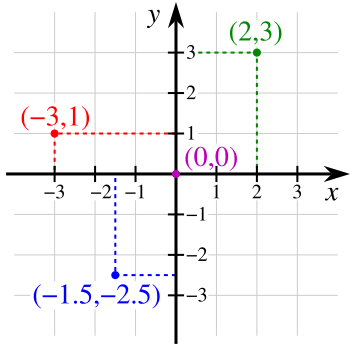
And what was this great principle? What we now take for granted, the Cartesian Coordinate System (what we refer to as X and Y coordinates).

Allow me to quote that kid's book:

"Graphs turn pairs of numbers represented by x and y into meaningful shapes. This idea was invented by the French philosopher Rene Descartes, who is perhaps more famous for saying "I think, therefore I am." It allowed people to solve geometric problems with algebra and algebraic problems with geometry."
(Bridgman, R, 1000 Inventions and Discoveries, Dorling Kindersley Limited,
2002, pp 90)

If Descartes hadn't invented the system no doubt someone else would at some point - such is human ingenuity - so I don't for one minute suggest that _xmouse or _root.movieclip._y would not be possible without him. But the fact that Descartes was at least one of the independent inventors, and could be bothered to record and share his invention way back in 1637, deserves him some credit. So, today I briefly doff my cap to Descartes for his coordinate system (in much the same way I might tip my hat to Sir Tim Berners-Lee (inventor of the WWW) or Thomas Knoll (a founder developer of Photoshop) were I to pass them on the street).

The Wikipedia article on Cartesian Coordinates is an excellent introduction, and even gives formulas for transformation, reflection and rotation of geometry (all of which could form the basis of some useful Actionscript).

Just remember that with Flash the (0,0) point of the cartesian coordinate system is the top left hand corner (not the bottom left hand corner as it is with graphs).

Moving on...

Wednesday, 12 August 2009

Mouse Control for Flash Games - Part 2 - (Top Down Driving Game with Steering)

A couple of months ago I posted a solution for getting a MovieClip to follow the mouse, with easing. It was a quick solution for controlling the 'player' in a top-down car game.

Since then I have revised the code to also make the 'player' rotate in the direction of travel, to simulate the effect of the car steering.

Take a look:

Original Movie (without steering) - Demo SWF


Modified Code (with steering) - Demo SWF


As you can see the rotation produced by the modified code offers more realistic looking game play, allowing the 'player' car to appear to swerve as the player moves the mouse, and making the 'player' car straighten up as it comes to the end of its movement.

The Code

The code is actually remarkably simple, much simpler than I expected. As I look back through my development versions it gets progressively simpler as I cut out all the redundant code and am left with only what matters.

I will give you the code below, the comments explain how it works. Just paste it into your Flash Actionscript panel, and click the format button to make it nice and easy to read:

/* Includes code from http://dansinteractive.blogspot.com http://www.digitalarena.co.uk */
/* This code works best if your movie is set to run at 30fps. */

/* The higher the frame rate the lower this number must be. */

var easing = 10;

/* Influences how far the player_mc rotates in response to the mouse distance from the player_mc. The lower the number the greater the rotation. */

var rotatefactor = 4.5;

/* This function animates the player_mc in response to mouse moving. */

onEnterFrame = function () {

/* Works out the current distance between the X coordinate of the mouse and the X coordinate of the player_mc */

mousediff = _root._xmouse-_root.player_mc._x;

/* Moves the player_mc along the X axis towards the location of the mouse with easing to provide some delay and smooth movement. */

_root.player_mc._x += mousediff/easing;

/* Rotates the player_mc towards the mouse. The amount of rotation is determined by the difference between the player_mc location and the mouse location along the X axis, and the rotation factor defined in the variable at the top. The closer they are together the smaller the amount of rotation, the further apart the larger the rotation.
With the _rotation method a negative number means anti-clockwise (counter-clockwise) and a positive number means clockwise. Even so, we do NOT need to test which side of the player_mc the mouse is on to determine whether the angle of rotation should be positive or negative. This is because we base the rotation on the distance between the mouse and the player_mc, and if the mouse is to the left of the player_mc this code will return a negative number which in turn will give us a negative rotation factor. Cool.*/

_root.player_mc._rotation = mousediff/rotatefactor;
};


As you can see, the whole affect is achieved without trigonometry. As such it simulates the visual appearance of the 'player' car steering, but is not a mathematically accurate model of steering. But it is only intended to provide user mouse control of a car for a simple top-down driving game - accurate physics are not necessary.

The thing I am most pleased about (apart from the cool effect) is how little code it takes. Without comments, it is a mere 7 lines long. And yet it provides so much more engaging game play (I think so anyway). If you find it helpful, leave a comment.

Later.