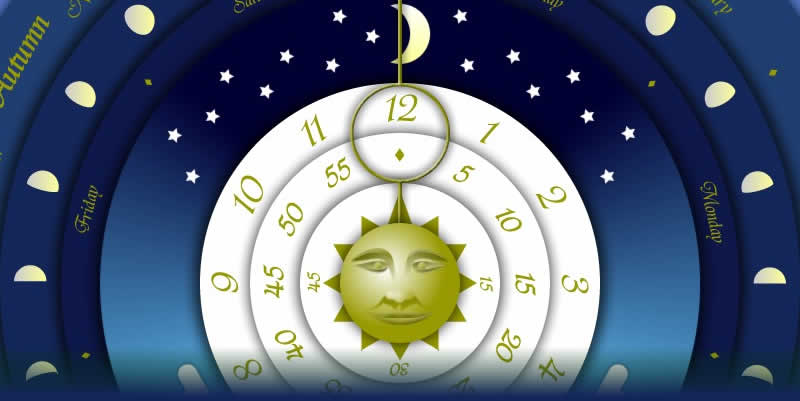
Some projects are just plain fun. You get an idea, you get inspiration on how it should look, you research the maths that goes behind it and crack on until it is done. The Annual Clock is one such project for me. I actually finished it as a Flash application almost a year ago, but only just got round to converting it into a screensaver.
The Idea
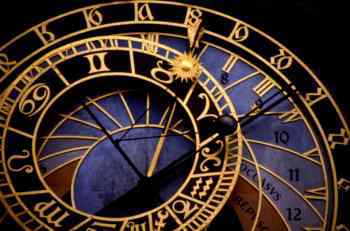
Visually it was inspired by astronomical clocks of yester-year (such as the one below).
My aim however was not to portray the movement of heavenly bodies as much as it was to portray the passage of time in a more unique way than the standard hour, minute and second hands. Something about a clock that showed all layers of 'time' passing at once seemed an exciting and relatively unique prospect. My approach took a series of discs, each portraying a different element of time measurement, radiating out from the centre, with each disc moving progressively more slowly working from the instant, through seconds, minutes, hours, daylight, days, moon phases, months and seasons. I stopped there since the next levels (e.g. years, centuries, milleniums etc) would give the clock a lifespan, something I wanted to avoid. Rather than using hands I had the discs rotate instead, with the centre point representing the person - the instance of time in which we exist now.
But enough of concept.
The Maths
The code for the passage of time is pretty straightforward. You take the current computer system time and date, and use it to rotate the discs as a proportion of 360 degrees. Not too difficult. The tricky part was dealing with items that don't stick rigidly to our calendar such as Easter, the moon phases, and the solstices and equinoxes.
For the Easter calculation I did an ActionScript implementation of a formula on the BBC H2G2 website.
For the solstices and equinoxes I did an ActionScript implementation based on the astronomical algorithms of Jean Meeus (Astronomical Algorithms, 1st Ed., 1991) which someone had posted online somewhere (can't remember where now). Meeus's formulas calculate the date of the current year's solstices and equinoxes, but gives the result as a date using the Julian calendar. (In fact Meeus's formulas calculate the time of the events to within 4 minutes of actual with any error down to orbital perturbation - how cool is that?)
However a Julian date was not suitable for my needs, and meant some highly complex conversion from the Julian to the Gregorian calendar based on a formula published online by Utrecht University.
I confess I didn't understand most of the formulas (but then I am not an astrophysicist or mathematician - and I gave all sources their dues in my ActionScript comments). But that's the great thing about ActionScript's mathematical functions - if someone has written it out, it is fairly logical how you need to set up the same thing in ActionScript.
The moon phases are based on the mean moon phase duration as reported by NASA from the year 2000 (so it won't be perfect forever, but pretty good for this purpose).
So, my particular thanks go to Meeus, Utrecht University and NASA for helping me with the bit I could never work out on my own without some serious long term astronomical observations of my own. The practical upshot is a Flash based clock application that not only shows the passage of time from seconds to seasons, but also one that can predict Easter, the equinoxes and solstices, and understands that moon phases are not precisely 28 days long. Thanks folks.
You may have come across flash menus where you drag a selector over a row of small images which slides a larger row of the same images into view. This code example is a basic solution to that problem.
Method
1. First produce all your images. You need a large version and a thumbnail version of each. Then import them into Flash.
2. Place your thumbnail images in a row on the stage. Make sure the centres of the images are equally spaced. Then select them all, and press F8 to convert them into a MovieClip.
3. Place your larger image in a row on the stage above the thumbnails, in the same sequence as the thumbnails. Make sure the centres of the images are equally spaced. Then select them all, and press F8 to convert them into a MovieClip. Give the MovieClip the instance name items_mc.
4. Create a draggable selector. Mine has a transparent fill so that I can click on it anywhere, but still see through it. Convert it into a MovieClip called slider_mc. Place it over the centre of the first thumbnail in the row.
5. Find out the distance in pixels between the centre of the first large image and the centre of the last large image. This will be used for the variable itemwidth in the ActionScript.
6. Find out the coordinate of the centre of the first thumbnail. This will be used for the variable sliderleft in the ActionScript.
7. Find out the coordinate of the centre of the last thumbnail. This will be used for the variable sliderright in the ActionScript.
And that is all your preparation done.
The Code
Insert the following code in the first keyframe of your movie. Then replace the values of the itemwidth, sliderleft and sliderright variables with the values you worked out in steps 5-7 above.
/*This whole mechanism assumes that the CENTRES of all items are equally spaced.*/

/*starting x coordinate of the CENTRE of the first item in the row*/

var itemstart = _root.items_mc._x;

/*Item width is the distance between the CENTRE of the first item in the row and the CENTRE of the last item in the row*/

var itemwidth = 1920;

/*this time I use the difference between coordinates of the CENTRE of the first and last items to determine the width*/

var sliderleft = 40;

var sliderright = 520;

var sliderwidth = sliderright-sliderleft;

/*slider*/

/*Allows us to drag the slider in a straight line between 2 fixed coordinates when the mouse button is clicked on it*/

_root.slider_mc.onPress = function () {

this.startDrag(false, sliderleft, 340, sliderright, 340);

}

/*stop drag when we let go*/

_root.slider_mc.onRelease = function () {

stopDrag();

}

/*stop drag when we let go if we happen to be outside the boundaries of the flash movie*/

_root.slider_mc.onReleaseOutside = function () {

stopDrag();

}

/*repositions the items_mc depending on how far we have dragged the slider is based on a ratio of how far the slider has been dragged along the available length. 0 means the slider is at the start, 1 means it is at the end, 0.5 would mean it is in the middle*/

onEnterFrame = function () {

sliderratio = (_root.slider_mc._x - sliderleft)/sliderwidth;

_root.items_mc._x = itemstart - (itemwidth*sliderratio);

}
When you are done, press CTRL+ENTER to test. You should be able to bring any of the larger images into view by dragging the slider over the thumbnail version of the same image.
This is simple stuff compared to doodling apps and platform games, but no less vital if that's what the job requires. Here I give a brief intro to making Flash link to external URLs.
We can often think of Flash as creating standalone apps that talk only internally, but sometimes there is a need for your Flash work to link to external web pages, either because you are making a Flash menu for a website, or because you want your Flash based CD ROM interface to link to your website.
Whatever the reason, it's really simple.
Example
In this example I have 2 simple buttons that link to other websites.
Make some buttons
In this example I have a simple button symbol in the Library. I drag 2 instances of the button onto the stage and give each the following instance names: "google_btn" and "bbc_btn".
Then I add the following ActionScript.
The Code
This ActionScript is added to the first keyframe on the root timeline:
_root.bbc_btn.onPress = function () {

getURL("http://www.bbc.co.uk/","_blank");
}
_root.google_btn.onPress = function () {
getURL("http://www.google.co.uk/","_blank");
}
How does it work?
Nothing could be simpler. We use a simple onPress event handler, so as soon as the button is pressed the action happens. The action is very easy to follow - we are using getURL and then specifying the URL and the target window.
This year my students will be learning about game engines. For 3D they will most likely use the Unreal Development Kit, along with 3DS Max/Carrara 8 Pro for content creation. But that's all 3D - what about the 2D games? Well, for 2D, my platform of choice is Flash.
Problem is, that unlike the UDK, or Unity, or even the FPSC, Flash is not a game engine - and that means, not only creating and scripting content for 2D games, but also scripting the whole engine.
It's something I have been meaning to do for a while. And while I know that many talented developers have posted Platform game solutions online, there is something about working through the problem yourself that I really like. Besides, I don't always get on well with other people's code - and if I am to teach my students to code their own, I need a solution I have worked out so I know it inside out and backwards and can really explain it to them.
Many of you will want the code now, but I am still fine tuning it. Meanwhile, here is version 4d as a peep of how it is going so far (I am currently on version 4f).
Controls:
JetPack = SPACE Left = LEFT ARROW Right = RIGHT ARROW Climb Ladder = UP/DOWN ARROW
When it is finished I will post the code and an explanation.
The basic way of including sound in your Flash movies is to add them to keyframes in the timeline. And this is fine for sounds that must coincide with animated events, or simple audio feedback on button rollovers. But if you want more sophisticated control over sounds, like starting and stopping them individually, or changing their volume, then you need to use ActionScript.
Preparing sound for ActionScript control
In Flash you can either load an external sound, or you can export sounds in your document Library for ActionScript. If you want to learn more about loading external sounds read my post on making an MP3 player in Flash. In this post I am going to just look at exporting sounds from the Library.
First off then you need to import all the sounds you need into your document Library of your .fla file. To do this click File > Import > Import to Library. Then browse for the sound file you need and click "OK". The sound will be imported into your Library. If you can't see your Library click CTRL+L (Cmd+L on the Mac).
Repeat this import step as often as you need to for every sound you need to appear in the Library.
Once they are imported you need to change their linkage settings to you can access the sounds with ActionScript. To do this right-click one of the sounds in the Library and choose linkage. When the Linkage Properties box opens tick the Export for ActionScript option, the Export in first frame will automatically be selected, this is fine. Then you need to give the sound an Identifier. By default the Identifier will be the same as the sound's original filename, but I find it helpful to give it an Identifier that makes it easy to remember what it is e.g. "backgroundmusic" or "whizzysound". Once you have given it a new Identifier you can click the "OK" button.
Repeat this step for every sound in the Library that you want to control with ActionScript.
Controlling sound with ActionScript
All this code should be added to the first frame of your Flash movie. I like to create a separate layer called "Actions" just for the code to keep it separate from other layers and so I know where all my code is when I want to edit it.
So far you have set some sounds in the Library to export for use with ActionScript and given those sounds Identifiers. Now we write the code to make use of those sounds.
Creating a sounds object and attaching a sound
First you create a sound object for each of the sounds you want to use, and then attach those library sounds to the objects. In this example let's pretend we have just one sound in the library with the identifier "backgroundloopsound". Here's how you create the sound object, and then attach "backgroundloopsound":
/* create a sound object */

var sound1_snd:Sound = new Sound(sound1_mc);


/* attach a sound from the library to the sound object */

sound1_snd.attachSound("backgroundloopsound");
In the above code I have created a sound object called "sound1_snd". I have given the object a target of sound1_mcwhich will allow me to control the sound independent of other sounds - but for this to work I must also add an empty MovieClip to the stage called "sound1_mc". I do this by creating a new MovieClip symbol in the library with nothing in it. Then I drag this symbol to the stage and give it the instance name "sound1_mc".
Then I have used "attachSound" to attach "backgroundloopsound".
Controlling the sound through the sound object
Now that we have a sound object with a sound attached, we can control the sound by controlling the object. Here are some examples.
Starting Sound
/* to make it play automatically, just put it in your code near the top */

sound1_snd.start(0, 100);
In the code above, the first 0 in the parenthesis means that the sound should be started at the beginning. If you have a 20 second sound, and you want to start it from 10 seconds in, then you should write sound1_snd.start(10, 100). The 100 in the parenthesis tells Flash how many times to loop the sound, when setting this, think about how long someone might stay on the scene and make sure you have enough loops or the sound will stop before they leave.
The previous start sound code starts the sound as soon as the frame loads in the flash movie. If you only want a sound to start when the user clicks a button, you need to first make the button and give it an instance name such as startSoundButton_btn, and you need to surround it by an event handler such as onPress:
_root.startSoundButton_btn.onPress = function () {

sound1_snd.start(0, 100);

}
Other ways of controlling sound
You can stop the sound:
sound1_snd.stop();
You can change the volume of the sound:
/* 0 = no volume, 100 = full volume, 50 = half volume etc... */

sound1_snd.setVolume(50);
If you want any of these to work when the user clicks a button, once again, you need to make a button and an event handler.
Here's an example
For this example I have 2 sounds in the library, one is a recording of me saying the word 'background" once. The other is a recording of me saying the word 'button' once. These were saved as WAVs and imported into the stage.
Then I right-clicked the 'background' WAV in the Library and chose "Linkage" and I set it to export for actionscript and gave it the handler "backgroundsound".
Then I right-clicked the 'button' WAV in the Library and chose "Linkage" and I set it to export for actionscript and gave it the handler "buttonsound".
Then I made an empty MovieClip by creating a new MovieClip symbol in the Library with nothing in it.
Then I dragged an instance of the empty MovieClip onto the stage and gave it the instance name "bgsound_mc".
Then I dragged another instance of the empty MovieClip onto the stage and gave it the instance name "buttonsound_mc".
Then I made a button symbol in the Library and dragged 4 instances onto the stage. The buttons were given the instance names: "button_btn", "bgmute_btn", "allmute_btn" and "unmute_btn".
I then added static text by each button to remind me which was which.
Once all that was done it was time to add the code.
/* create a sound object for the background sound */

var background_snd:Sound = new Sound (bgsound_mc);

/* attach a sound from the library to the sound object */

background_snd.attachSound ("backgroundsound");

/* create a sound object for the button sound */

var button_snd:Sound = new Sound (buttonsound_mc);

/* attach a sound from the library to the sound object */

button_snd.attachSound ("buttonsound");

/* start the background sound loop and set it to mute as default */

background_snd.start (0, 1000000);

background_snd.setVolume (0);

/* set the button sound to play on button roll-over */

_root.button_btn.onRollOver = function () {

    button_snd.start (0, 1);

};

/* making the mute background button work */

_root.bgmute_btn.onPress = function () {

    background_snd.setVolume (0);

};

/* making the mute every sound button work */

_root.allmute_btn.onPress = function () {

    background_snd.setVolume (0);

    button_snd.setVolume (0);

};

/* making the un-mute button work */

_root.unmute_btn.onPress = function () {

    background_snd.setVolume (100);

    button_snd.setVolume (100);

};
That's it
That's the basics. You can of course use different event handlers such as onRollOver, onRollOut, onDragOver to trigger the sounds or change their volume. You can of course use event handlers to trigger more than one sound, or more than one action, you might start one sound while changing the volume of another at the same time for instance.
It's up to you to be creative, now you know the basics.
Slider or sliding inputs for user interfaces are not new, we get them in desktop software and on the web. But this one is slightly different. Instead of sliding the handle along a bar, the handle stays still and the bar moves. This is helpful when the bar contains measurements that are too big to fit on the screen.
In this example we are pretending to measure height. Just click and drag the pointer to measure.
As you can see the code that prevents the ruler dropping off the end is a bit clunky, but it will do for now.
How to make it
Make a MovieClip of a ruler, with the scale spaced evenly along its entire length - set the registration point to be the bottom-left of the MovieClip. Then make another MovieClip for the ruler pointer - set the registration point to be the bottom-left of the MovieClip too.
Place both MovieClips onto the stage and scale them so that the fit together nicely, but also so the ruler is much much longer than the stage is high.
Give the ruler the instance name 'ruler_mc' and the pointer the instance name 'pointer_mc'.
Then insert the following code onto the first frame of the movie.
The code
The comments will give you some idea of what does what:
var damping:Number = 20;

/*the higher the number the slower the ruler will move*/

var rulerdivisions:Number = 20;

/*this helps us work out the how far the along the ruler you are*/

/*make the rule move when the pointer is dragged on*/

moveruler = function () {

    if (_root.ruler_mc._y >= _root.pointer_mc._y && (_root.ruler_mc._y - _root.ruler_mc._height) <= _root.pointer_mc._y) {

        movefactor = (clickstart - _ymouse) / damping;

        _root.ruler_mc._y += movefactor;

    } else if (_root.ruler_mc._y <= _root.pointer_mc._y) {

        _root.ruler_mc._y = _root.pointer_mc._y;

    } else if (_root.ruler_mc._y - _root.ruler_mc._height) {

        _root.ruler_mc._y = (_root.pointer_mc._y + _root.ruler_mc._height);

    }

    measure = Math.floor ((_root.ruler_mc._y - _root.pointer_mc._y) / (_root.ruler_mc._height / rulerdivisions));

    measure_txt.text = measure+" cm";

};

/*check when the pointer is dragged*/

_root.pointer_mc.onPress = function () {

    clickstart = _ymouse;

    moveRulerInterval = setInterval (moveruler, 15);

};

/*check when the dragging stops*/

_root.pointer_mc.onRelease = function () {

    clearInterval (moveRulerInterval);

};

_root.pointer_mc.onReleaseOutside = function () {

    clearInterval (moveRulerInterval);

};
And that's all there is to it. If you have a neater way of stopping the ruler from dropping off either end, feel free to post your solution as a comment.
Making it useful
If youwant to use the input of this interface for something useful, perhaps to base other calculations on it, simply use the 'measure' variable within your formula, to represent the user's input.
Inspired by Dragon's Den this week, when 2 guys demonstrated a fun drawing program they had made, I decided to learn some more about Flash's drawing API to make a very much simpler doodling application in Flash.
Try It
It might look complex, but the hardest bit is only 26 lines of ActionScript, including comments. What makes me laugh the most, is that the whole application comes out as less than 2Kb.
The Code
It's getting late in my time zone, so I won't dissect the code in this post. But enjoy the code, and I'll explain it another time:
//Code from http://dansinteractive.blogspot.com

//default settings

var layernum = 0;

var curcolour:String = "0x000000";

var curlineweight = 5;

//draw the line

drawline = function () {

["layer"+layernum+"_mc"]lineStyle(curlineweight, curcolour, 100);

["layer"+layernum+"_mc"]lineTo(_xmouse, _ymouse);

};

//start drawing on mouse press

_root.paper_mc.onPress = function() {

layernum += 1;

startx = _xmouse;

starty = _ymouse;

createEmptyMovieClip("layer"+layernum+"_mc", this.getNextHighestDepth());

["layer"+layernum+"_mc"]moveTo(startx, starty);

drawlineInterval = setInterval(drawline, 10);

};

//stop drawing on mouse release

_root.paper_mc.onRelease = function() {

clearInterval(drawlineInterval);

}

_root.paper_mc.onReleaseOutside = function() {

clearInterval(drawlineInterval);

}

//colour selector

_root.black_mc.onPress = function () {

curcolour = "0x000000";

}

_root.blue_mc.onPress = function () {

curcolour = "0x0000FF";

}

_root.cyan_mc.onPress = function () {

curcolour = "0x00FFFF";

}

_root.green_mc.onPress = function () {

curcolour = "0x00FF00";

}

_root.magenta_mc.onPress = function () {

curcolour = "0xFF00FF";

}

_root.red_mc.onPress = function () {

curcolour = "0xFF0000";

}

_root.white_mc.onPress = function () {

curcolour = "0xFFFFFF";

}

_root.yellow_mc.onPress = function () {

curcolour = "0xFFFF00";

}

//line thickness selector

_root.line1_mc.onPress = function () {

curlineweight = 1;

}

_root.line3_mc.onPress = function () {

curlineweight = 3;

}

_root.line5_mc.onPress = function () {

curlineweight = 5;

}

_root.line10_mc.onPress = function () {

curlineweight = 10;

}


 Posts
Posts


